
Generating a Grid of Gems
Part 5 of Ground Zero: Programming from the Ground Up
Last updated on July 23, 2026
A brief introduction to instantiating GameObjects from prefabs in Unity.
How to Clone Prefabs
Now that we have a starting script for the GemManager and some gem prefabs, we can put them together to create a grid of gems. The first thing we'll need to do is add a field to our GemManager class that will store a reference to one of the prefabs we made. In general it's a convention to have all your fields above all your methods in the code for quick and easy access. To do that, add the following code inside the class after the opening curly bracket, but before the Start method:
To recap from the previous video: variables first have the access type (public or private), then the type of data we want to store (GameObject), and finally the name of the variable (gemPrefab). Since declaring that a variable exists is a statement, we need a semi-colon as well.
Now if you look at the gem manager in the inspector, you should see a new input field appear on our GemManager component. Similar to selecting a sprite, you can click the dot and circle icon to open up a search window and look for the GameObject you want to set as the gem prefab. There are two tabs, “Assets” and “Scene”. The assets tab shows all GameObjects stored in the assets folder, which would be our prefabs. The scene tab just shows any GameObject instances in the actual scene, which is just our camera, light, and gem manager for now. You can also drag an asset from the project window into the input, or in this case drag one of the gem prefabs.
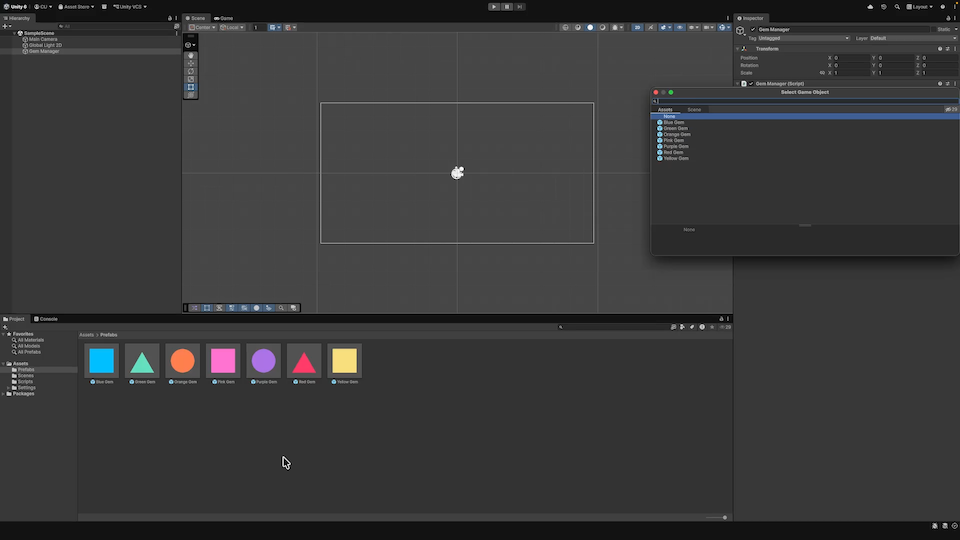
Once you set the prefab to use, our gem manager can take that prefab and make gems by duplicating it and putting that copy into the scene. Back in VS Code, add the following line inside the Start method (between the curly brackets):
MonoBehaviours (or any classes based on that class, like our GemManager) have an Instantiate method, which allows you to create a new GameObject in the scene based on the template or prefab that you give it. In this case, we are telling the GemManager to create an instance of (or instantiate) the gem prefab when the game starts. Going back to Unity, you can hit the play button at the top middle. It may take a few seconds to load, but once it does you should see the gem we created appear. Press the stop button to exit play mode.
More Field and Variable Accessibility
Before continuing with instantiating a grid of gems, I want to call back to the previous video where I talked about variable accessibility. We won't need to know about the gem prefabs in any class other than GemManager, so let's make the gemPrefab field private. As a convention, private field names start with an underscore to quickly show which variables are private when you are using them later in the code.
If you go back to Unity, you'll see that the gem prefab field no longer appears in the inspector. By default, any private field won't show in the inspector, so we need some way to tell Unity to show it anyway. That's where attributes and SerializeField come in. Attributes are used to describe a field, like its minimum value, a range of acceptable values, a tooltip in the inspector, etc. They can be very useful, but I won't list them all here. Instead, I'll challenge you to look them up as practice for researching game development, which is very important.
To add an attribute to a field, place the name of the attribute in square brackets before a field. Some attributes also take inputs like a function does, but we won't need those for now. Add the SerializeField attribute, which shows private fields in the Unity inspector:
Now you should see the gem prefab field in the inspector again, but you'll have to reassign the prefab you want (by selecting it again or dragging and dropping it in). Whenever a field is no longer visible in the inspector, Unity deletes its data because it isn't needed anymore. If you rename a field the same thing will happen, so make sure to reassign or reenter any data if you change the field's name. Side note: there may be another attribute you can use to prevent this. I encourage you to research that as well. Click the play button again after selecting a prefab to make sure it still works.
Generating a Grid
Finally we can create a grid of gems. For now we will just create a 2 by 2 grid manually, and with the same type of gem in every spot. In a later video, I'll teach you a better approach. For now, however, we will manually instantiate and position the gems one by one. First, we'll need to store a reference to each gem we create:
Note that we are creating a new variable inside the Start method. This isn't a field since it doesn't belong to the class. This variable is only accessible inside the Start method since we define it there, and only in the lines of code after we define it. Therefore, it's called a local variable, because it's local to that method. Just like any other variable, it needs a type and then a name. We can just declare a variable (saying it exists) by declaring its type and name, but in this case we also want to initialize it by setting its starting value.
To initialize a variable, you can add an equals sign after the name and then whatever you want the value to be. In this case, the Instantiate method returns the newly created gem. That's the GameObject we want to store in our new variable. Now that we have a reference to the gem, we can position it in the grid. Remember from a previous video that a Transform contains the position of a GameObject. GameObjects have a “transform” field that stores a reference to its Transform component. From there we can modify the position similar to how we initialized a variable's value:
On the left side, we give the variable name, and on the right side we give the value to assign to the variable. Also remember in the previous video how the position of a GameObject has a value on the x-axis, on the y-axis, and on the z-axis. However, we will only need the x and y coordinates for a 2D game (where z is usually 0). We'll ignore the z axis, because it's only needed for 3D games.
Unity has a class called Vector3, which is used to store 3D vectors. Vectors have a length and a direction, represented by a value in each dimension (x, y, and z). Instantiate is used to create a new instance of a GameObject based on a prefab, but when creating a new instance of a non-MonoBehaviour class we can just say “new”, the class name, and any inputs. In this case, this is a new Vector3 instance, with an x position of -1, a y position of -1, and a z position of 0. To save space, we can also just give it an x and y position. It will assume a z position of 0, because z is an optional input / parameter.
Notice you can use the up and down arrows when the autofill menu pops up to see these two ways of creating a new Vector3 instance. Sometimes other methods you call will have multiple ways of calling it (using optional parameters) that you can see in the autofill menu as well.
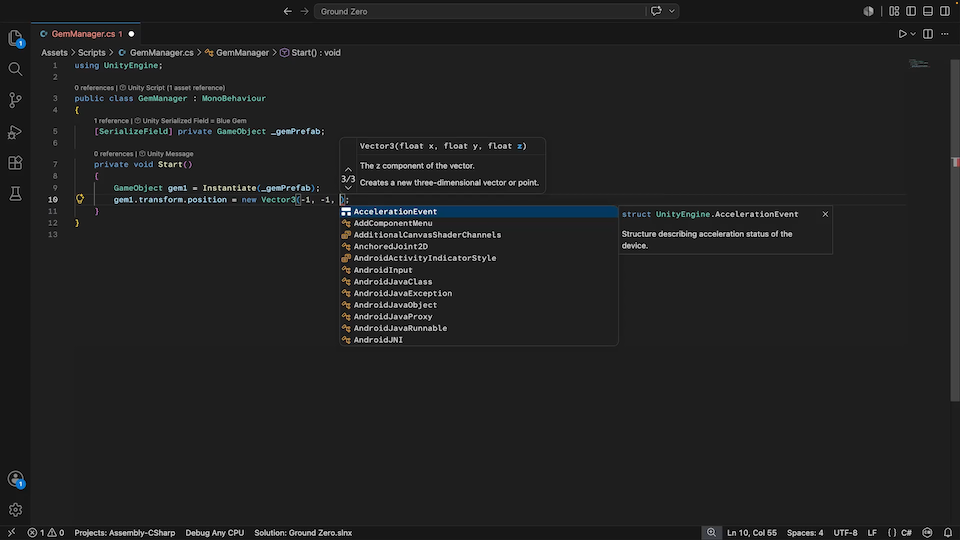
Now let's create three more gems, at the following positions: (-1, 1), (1, -1), and (1, 1).
This is rather inefficient, but it will work for now. In future videos we will cover how to improve this, starting with a better way to keep track of our gems and easily instantiate many gems of different kinds with only a few lines of code. Until then, God bless, and keep up the good work! You've been learning a lot so far, and we're so proud!