
Introducing OOP, C#, and VS Code
Part 4 of Ground Zero: Programming from the Ground Up
Last updated on July 10, 2026
A basic introduction to Object Oriented Programming, the C# programming language, and Visual Studio Code.
IDEs and VS Code
In the previous video, we went over a basic introduction to the Unity game engine, showing how it combines different assets together to create a game. Unity uses scripts to connect these assets together into something interactive. Scripts are the files containing our game's C# code. While we can edit this code using any normal text editor, programmers usually use something called an Integrated Development Environment (or IDE) to write the code for any programming project.
IDEs are a lot more complex than standard text editors like Notepad on Windows or TextEdit on Mac. They contain a lot of helpful tools that speed up the development process when programming. They usually have autocomplete, which gives suggestions based on what you are typing and related information as well. IDEs also have helpful color coding that distinguishes different parts of your program. Furthermore, IDEs will show any mistakes you have in your code based on the language's rules (like misspelling something).
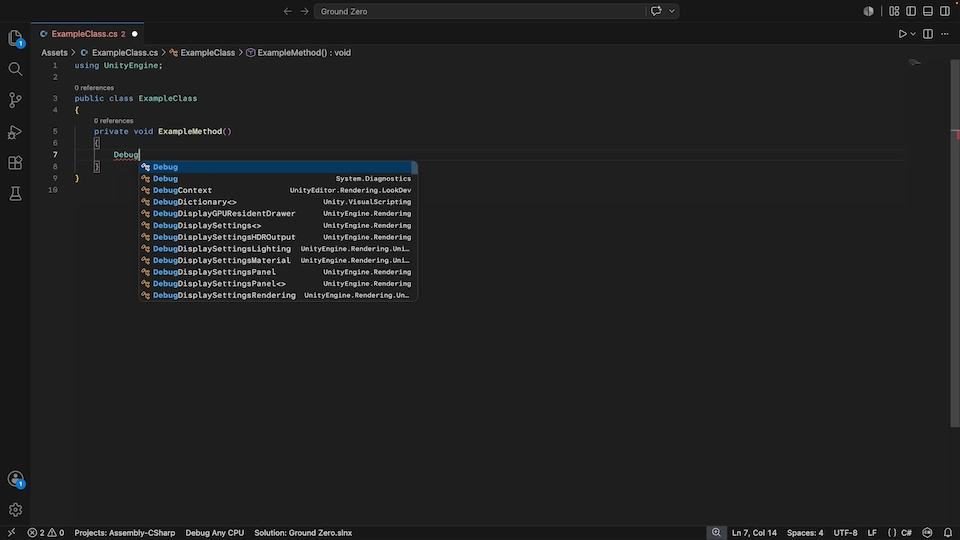
While there are several good IDEs out there, VS Code is very common for a lot of types of programs and it works great with Unity. If you remember the installation process for Unity, VS Code was listed to download alongside the Unity editor, which sets up the IDE to work well with Unity right away. You can research and look through the settings to improve your experience (like changing the color theme), but it's pretty good already with the default settings.
Objects, Classes, and Instances
One of the most important things in programming is to understand the basic concepts. Once you understand the basic concepts, you can use them to solve complex problems. For this series, we'll talk about Object Oriented Programming (or OOP), because that's usually how you program games in the Unity game engine, among others. OOP is a style of programming that is oriented (or focused) on objects and classes. Objects and classes are a way of grouping data and behavior together.
We need some way to easily handle the existence of multiple similar objects. In our game, for example, there will be several gems showing at the same time. How would we keep track of all that? That's where classes and object instances come in. Think of a class like a template or a blueprint for objects. They describe what data objects contain and how they behave. When you need a new gem, create an instance of the Gem class. These instances all have separate data (like different colors and shapes), but shared behavior (like swapping and breaking).
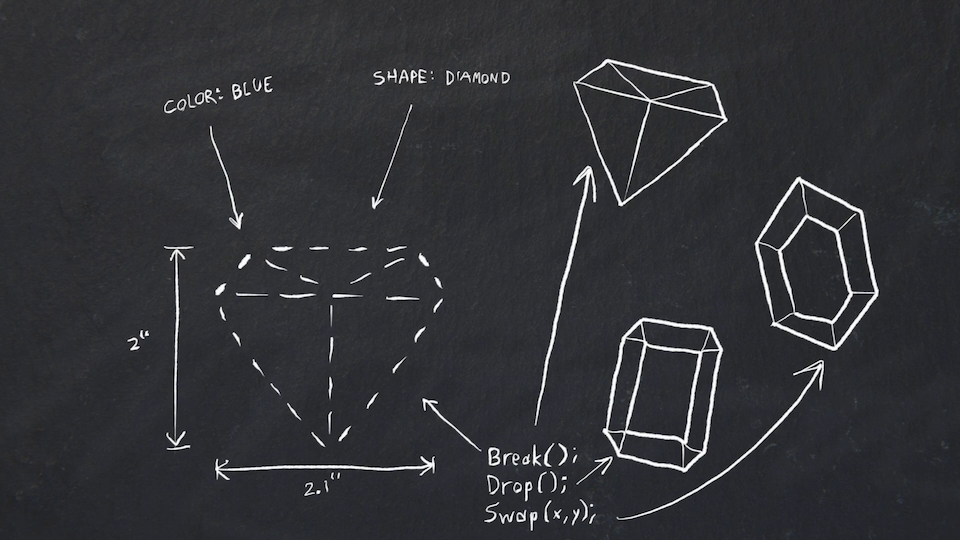
You can think of this like people. We're all made from a similar template, so imagine a Human class to represent data and behavior about people. We often have a lot of the same behavior, like breathing, eating, drinking, and sleeping. Humans also (usually) have a lot of the same pieces that make them up, like eyes, ears, mouths, hands, and feet. We all have eye colors, but the eye colors themselves may be different per person (or instance). Same with other characteristics, like how many fingers or hands you have.

Variables and Fields
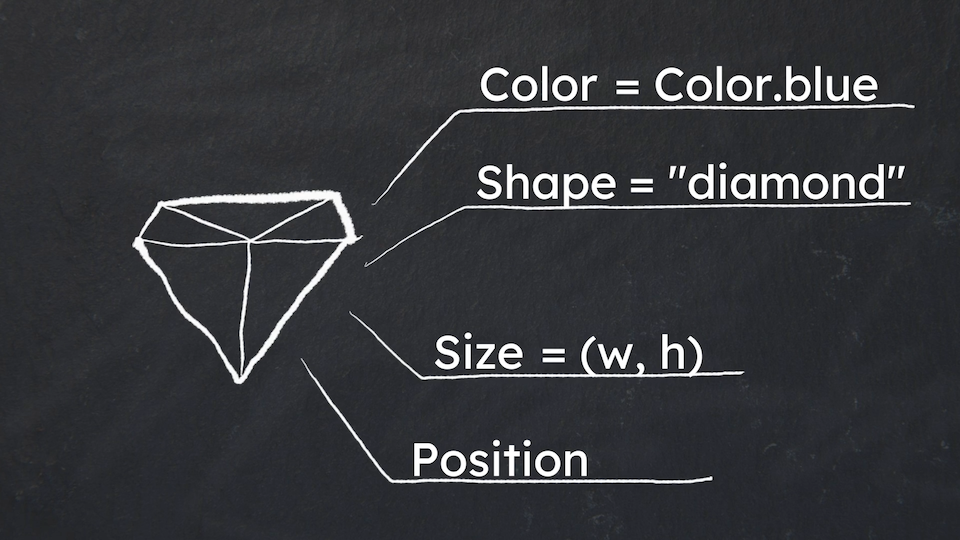
Each characteristic of an object, like the color or shape of a gem, can be represented as a field in that object. That means we can have a color field, shape field, size field, and position field, among others. A class's fields are represented by variables, which are containers to store data in, like a number. They're called variables because they are data that can vary in value, like a size that decreases over time.
Variables have a type that tells what kind of data is being stored and a name to give it a label. Picture variables like boxes. Each box can have a different type and a label on it that says what's in the box. One box might be made to fit a gaming console in it, while another box might be made to fit a controller for that console. You can fit different gaming consoles in that box, but it's a box that's specifically for gaming consoles. Same with a box for controllers. You wouldn't put a gaming console into a box made for storing a controller.
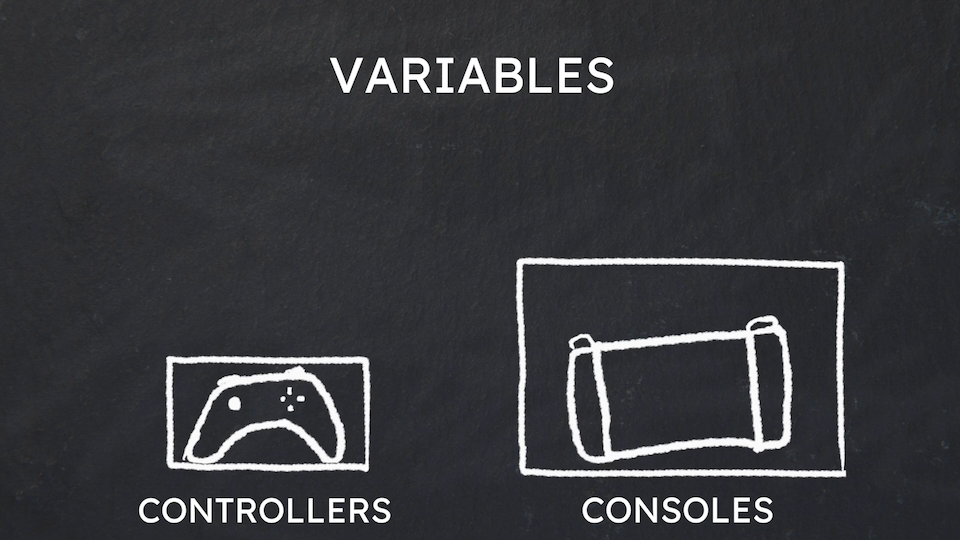
Each of our example fields has a different type of data needed to represent them. Colors, for example, are represented by a Color class built into Unity. What about size? That may be one number if it's the same in both dimensions, but it might need multiple numbers if it has multiple different dimensions (like width and height). What about shape? That would need a totally different type of data to represent text like the word “diamond”.
There are usually types built into a programming language like C#. Here are some common ones:
- bool - A boolean which is either true or false
- int - An integer, which is a whole number like 2
- float - A floating point number, or a number with decimal places like 2.3
- string - A list of text characters. Picture those happy birthday signs that have each letter held together by a string to spell “Happy Birthday!”

Often, though, the built-in types aren't enough on their own, so programmers create classes as custom types. For any class we make, a variable can use that type and store object instances of that class. Therefore, Gem is a type and we can store a gem's data in a variable that has the Gem type.
Functions and Methods
Now that we have variables to represent the data or fields in objects, we still need something to represent behavior. That's where functions and methods come in. A function is a way of grouping code together to perform some action. It may take some inputs, and it may give some outputs. It doesn't need either, though.
An example function could be an add function, which would take two inputs and return the sum of them as an output. Another example would be to ask an instance of the Human class to walk, and give that person 1 mile as an input. In that case, there is no output because they don't return (or give back) anything to you. Our add function doesn't need an object to run (or execute) our code (since it's just adding numbers), but our walk function does, because it makes a person walk.
Methods are functions that belong to a particular class. It defines one particular behavior of an object, like walking. Our Gem class, for example, could have a swap method, drop method, and break method. The swap method could take a position to swap to and return (or output) nothing. The drop method could take a position to drop from and return where the gem landed. The break method wouldn't need any inputs and probably wouldn't give any outputs, but rather just use the fields of the object. For the most part, all gems swap, drop, and break the same way. Functions and methods can make it easy to share similar behaviors like these between objects of the same class.
Encapsulation
Some classes may have a lot of data and behavior, and they don't exist by themselves in isolation. Your code will usually have many classes, several of which will reference other classes. However, one class doesn't need to know everything about another class. For example, a GemGrid class might not be interested in what color or shape a Gem class has, but needs to know the position of a Gem. In turn, a Gem might not even need to know that the GemGrid exists.
Encapsulation is a concept in OOP that we use to define this behavior, where some fields and methods of a class are “encapsulated” or hidden and protected from other classes. In some cases, we encapsulate fields to prevent other classes from accessing or modifying them directly. Other times, we encapsulate fields and methods to hide data and behavior that other classes don't need to know about in order to work. An object of one class might just need an object of another class to do something, without caring how specifically it gets done.

Encapsulation also affects the autocomplete in VS Code, because it will only show what the class you are typing in has access to. If you are working in the Gem class, it will show everything the class has. If you are working in a different class / file, however, the autocomplete will only show you the parts of the Gem class that the other class is allowed to see or access.
Namespaces
Another concept related to encapsulation is namespaces. C# uses namespaces to group related classes together in a named space. Other programming languages may use the term library instead of namespace. The idea here is that we don't write all the code we need for a game, but instead we build upon other people's code. For example, Unity has a lot of code needed to run the game engine, and therefore a lot of code they've made available for us to use, rather than building everything from scratch. Why create custom code for drawing images on a screen, when instead we can write code to give Unity an image and tell it to draw the image for us?
Namespaces also influence VS Code's autocomplete feature. They, like encapsulation, help the autocomplete to focus on what you have access to, like only showing code from the namespaces you are working with, rather than from all the code in the project. Unity has a lot of namespaces to work with, especially when you start enabling more of its features, so it's important to only access the ones you need.
Adding Code to Unity
Now that we've covered some of the basics of programming, let's put them into practice. We'll start with creating a GameObject and class to manage our grid of gems, called a GemManager. Similar to how we made the square GameObject earlier, right click on the hierarchy window in Unity, then click “Create Empty” to create a new GameObject with just a Transform component. Call it “Gem Manager”.
Organization is important for any project, but especially complicated programming projects like a game, where you want an easy way of finding any asset you need. In Unity, there are multiple ways to organize your assets / files, but a simple way is just to create a folder for each type of asset. We already have a folder for our prefabs, so let's create one for our scripts. As a refresher, right click in the project window on the “Assets” folder, then click “Create” and “Folder” to create a new folder. Name this folder “Scripts”. This menu is how you create several different kinds of assets.
We'll use the same menu to create a new script for our game. Open the create asset menu in your new scripts folder and select “Create”, then “MonoBehaviour Script”. Name the file “GemManager” with no spaces. You don't want spaces in the names of script files for reasons we'll see later. We'll explain MonoBehaviour in more detail later, but it's a template for creating custom GameObject components.
To add a component to a GameObject in Unity, you can select the GameObject in the hierarchy, then click the “Add Component” button in the inspector. From there you can search for any component and add it. When you want to add a custom component, you can also drag the script you made from the project window onto the GameObject in the hierarchy or in the inspector. If you want to add behavior to a GameObject, it needs a custom component that makes it behave the desired way. This is why we are adding our GemManager script to the Gem Manager GameObject.
Once you've added the script, open it by double clicking on the script in the inspector, which should open Visual Studio Code. If it doesn't, you can also open the project folder in VS Code.
Understanding the Starter Code
Let's talk about the starting script for the GemManager. A C# script can contain any code, but when writing a custom component we need a class that will tell us what data the component needs (if any) and what the component does with that data. If this is your first time seeing any code, or even just C#, it may be a little overwhelming. You should see this as your starting code, and we'll break it down step by step:
The first line says that we want to use code from the namespace “UnityEngine”. UnityEngine is a namespace containing a lot of commonly used code in Unity, like the Transform component and the SpriteRender we saw in the previous video. At the end of the line is a semi-colon, which you will see a lot of in C# and many other programming languages. Any statement (like “use this namespace”) needs a semi-colon to tell the computer that you have finished the statement (like a period to say you've finished a sentence).
The second line has a lot going on. The word “public” is a keyword that means any other class can see and use this GemManager class. It's one of the keywords used for encapsulation. Keywords are special words built into C# that mean certain things to the computer. The class keyword is needed to tell Unity that we are making a new class. After saying who can access the class and that we are making a class, we need to give a name for the class (“GemManager” in this case). Any name for classes, methods, variables, etc. has a certain set of rules you have to follow:
- It has to start with a letter or underscore
- It can only contain letters, numbers, and underscores (_)
- The name of a script file should match the name of the class
- Names in C# can't include spaces, which is why you don't want spaces in the name of a script file
- Names are case-sensitive, meaning xPosition with a capital “P” is different from xposition with a lowercase “p”
Normally, we wouldn't need anything else in this second line. However, since we are making a component, we need to specify that our new class is based on the MonoBehaviour class. If a class has a base (or parent) class, it will “inherit” the data and behavior from that class, meaning it will have the data and behavior from that class along with any that we add in this class. There's a lot more to this idea of inheritance, but we won't cover that in this video. For now, just know that if you are creating a new component for a GameObject, you need a colon and then the word “MonoBehaviour”. Also, notice the spaces separating the different keywords.
The next line just has an opening curly bracket (or brace). That tells the computer we are starting a “block” of code. Code blocks are a set of lines or statements that run together, like this class or the methods it has. A block starts and ends with curly brackets. You'll notice the corresponding closing curly bracket is at the end of the file. Make sure you always have a matching closing bracket for any opening bracket.
You should also notice that any code inside a block is indented so we can easily see what lines of code belong to what block. The more blocks you have nested inside each other, the more indents (or higher level of indentation) you will have. In general, a few indents are okay, but we don't want too much indentation. Otherwise, there could be a lot of horizontal scrolling, which makes the code harder to read.
The next line is a comment, which is code for the people reading it that the computer will ignore. We'll talk more about comments later in this video.
Our fifth line in this starter code is a method called “Start”. When declaring a method, you must provide the return type (like int, string, or void), name, and then any inputs that will be passed into the function, inside a pair of parentheses. Since Start has no inputs, these are empty, and since it has no outputs, the return type is "void". After that is a set of curly brackets to show that this method is a block of code. We also have a method called “Update”, but you can delete that for now.
Similar to how we use the public keyword for the GemManager class, we can also use accessibility keywords for methods. For now, you just need to know public and private. By default the access type is private, like this Start method (meaning only the GemManager can see this method). Because the default is private, we only need to give the access type if it's public. However, it's good practice to specify public or private, because it makes the code clearer. Let's go ahead and add the private keyword to the Start method:
Designing Code for People
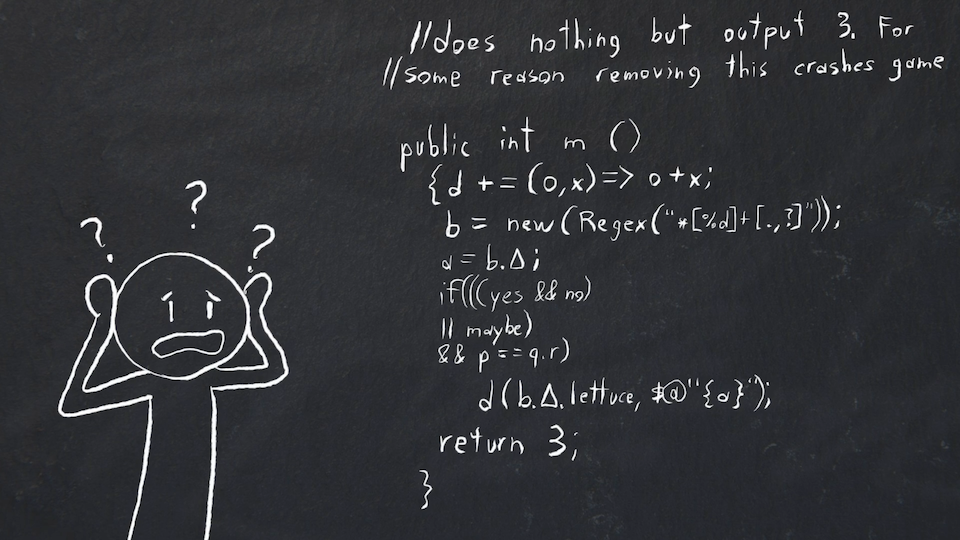
While we discuss using indentation and the private keyword for making code easier to read and understand, let's talk about readability and designing code for people in general. You'll notice there are multiple empty lines in the starter code that help break it up. Those are important for organization and readability, especially between blocks of code. Comments and naming are also super important.
Comments are text in code that the computer ignores. It's a comment because of the double forward-slash (//) at the start of the text. In our starter code, Unity uses a comment to explain the Start method (which we'll get into later in this video):
We write comments in the code to annotate the code for anyone reading it. The idea is to write code that is easily readable (or easy to understand), so that you don't need comments. However, there may be times that you do need them. If what a chunk of code does isn't obvious at first glance, a comment can help explain what that piece of code does or why it's there. In other words, comments are used to help people (including your future self) to better understand the code.
Although code is used by the computer (which doesn't care about readability), people are the ones writing and maintaining code, not to mention using it. A really important part of code is making it easy for others to use and understand it, even if it's just you in the future. From my over a decade of experience in programming, trust me when I say you may forget most of what your code does even just a couple months after writing it. So not only are comments important, but naming is also important.
Names help us understand what a variable, method, class, etc. is for. Usually you want to have clear and concise names. Not too short, and not too long. They should describe what a variable or class is, and what a function or method does. For example, favoriteColor would be a good variable name, and ChangeFavoriteColor would be a good method name. If you look closely, favoriteColor starts with a lowercase letter, but ChangeFavoriteColor starts with an uppercase letter. That's because we use different letter casing in C# for different reasons.
Variables usually use camelCase, which is where the first letter of the first word is lowercase (like camel), but every other word is capitalized (like Case). Classes and methods, however, use PascalCase, which capitalizes every word. There are other cases too, like snake_case in Python, but they aren't usually used in C#. This convention helps to distinguish variables from classes and methods, which is another important factor in readability. We could spend a long time talking about how to better design code for people, but these are at least the basics. It may not seem needed from the start, but the easier it is to understand simple code, the easier it is to fix problems with it or create more complex code.
Modifying and Running the Code
Back to our starter code, I still need to explain the Start method. GameObjects can either be active (turned on) or inactive (turned off). When a GameObject is activated for the first time (either when the play button is pressed in the editor / the game is started, or when manually turned on), the Start method is run on any components of the GameObject that have it. Therefore, when we press the play button, any code in our GemManager's Start method will run. If we turn the manager off and then back on again, the method won't run again because Start only gets called once for any given GameObject.
Let's add the following code inside the Start method:
This line prints or adds a message to the console window in the Unity editor. It uses the Debug class that Unity gives to help “debug” our code, which means to solve problems within our code (like figuring out why a gem isn't breaking when it should). Printing to the console is very useful for doing so. The Debug class has a method called “Log” to log or print a message to the console. It takes in a string input of what message to log. This line is calling (or running) the Log method.
Most methods actually need an object instance to be able to call them, but we don't need one in this case and can just reference the Debug class itself. After the object or class and a period, you need the name of the method to call and a pair of parentheses. Inside the parentheses are any inputs you give it (like a message), if it needs any inputs. If you are calling a method that doesn't take any inputs, you can just have an empty set of parentheses. Because this is a statement (we are telling the computer to log a message to the console), we also need a semi-colon afterward.
Now that we have some code set up, we can go back to the Unity editor. Whenever you add a script or make changes, you'll see a dialog pop up saying that Unity is compiling the scripts and reloading the domain. That sounds complicated but it just means that Unity is compiling your code, which translates it into a form that your computer can run (and removes any comments). Reloading the domain is basically just reloading your Unity project to use the updated code. You can look it up to learn more of the specifics, since I won't cover it in detail.
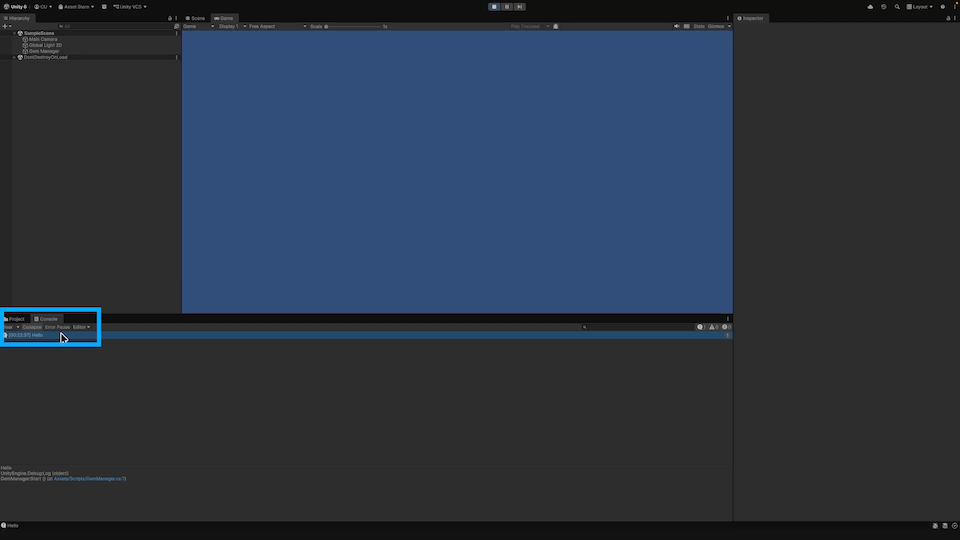
Press the play button at the top middle of the Unity editor to enter play mode. If you click on the console window, you should see a message with a 24-hour timestamp and the message “Hello” that we logged. Press the stop button to exit play mode.
That's all that we will do for this video. I'm not expecting you to learn everything all at once, and I certainly didn't. Also, experiment with the Debug class and see how else you can send a message to the console and how that impacts the way your message is displayed. Use autocomplete as you are typing (starting with “Debug” and then a period) to see what other methods you can play with. Also try deleting the semi-colon after Debug.Log(“Hello”) and see what happens in the Unity console and in VS Code.
In the next video, we will finally start making our grid of gems and put the gem prefabs we made in the previous video to use. Until then, God bless, and rewatch any part of this video that you don't understand yet. Feel free to ask any questions in the comments, as these are important concepts to make sure you understand before continuing.